- Nov 26, 2023
- 12 Min Read
- Remix
Progressively Enhanced File Uploads with Remix
How to Enhance the User Experience by Visualizing the Upload Progress in Real-Time
Your users have to wait anyway, but please, tell them for how long.
Let's face it, waiting is nobody's favorite.
Time is precious, and wasting it is just plain frustrating. Unfortunately, there are situations where waiting is inevitable. Especially when you want to ship large files over the wire.
In such cases, you know what's even more frustrating? Not having a clue when that colossal file I'm uploading will finally be done.
When implementing file uploads, it's common to resort to a simple spinner, mimicking an "uploading ..." status.
While effective for small files, the true mastery lies in visualizing the real-time progress of an upload, which ultimately improves the user experience of your application.

In this guide, you'll learn ...
- ... how to hook into the actual file upload progress
- ... how to push the file upload progress via Server-Sent Events (SSE) to the client
Progressively Enhanceable Traditions of the Web
Before diving into the enhancement, let's briefly recap the traditional way file uploads function on the Web.

Remix exposes the web platform. That said, there is nothing really Remix-specific about implementing a file upload. You need:
- A
<Form />with the encoding typemultipart/form-dataand an input with the typefile. - A controller (an action) for parsing the form.
- A file upload handler that writes the file contents to disk.
This is how you achieve it with Remix:
// ~/routes/upload.tsx
import { unstable_parseMultipartFormData, unstable_createFileUploadHandler } from "@remix-run/node";
export async function action({ request }: ActionFunctionArgs) {  const fileUploadHandler = unstable_createFileUploadHandler();
  await unstable_parseMultipartFormData(request, fileUploadHandler);
  return redirect("/upload/done");}
export default function BasicFileUploadExample() {  return (    <Form method="POST" encType="multipart/form-data">      <input name="the-file" type="file" />
      <input type="submit" />    </Form>  );}
While the traditional method of sending multipart/form-data forms has been around since the early days of the Web, it basically lacks a back-channel for transporting progress information back to the client while the upload is in-flight.
Fortunately, we're not stuck in the 90s anymore, thanks to emerging web standards that enable the creation of a back-channel. Among these advancements is Server-Sent Events (SSE), a mechanism designed for pushing information to the client. Implementing such technology would transform the described upload process into something like this:
- The user navigates to the
/uploadroute. - The client subscribes to a "stream of progress events".
- The user initiates the upload by submitting the form along with the file.
- During the upload process, the application monitors the writing of file chunks and sends live updates about the already uploaded bytes to the client.
- The client displays the actual progress in the UI.
When we look at our earlier example of implementing a file upload in Remix, the key component responsible for managing the upload is the fileUploadHandler. As a result, no other component in this process possesses more information about the actual progress than this handler.
As of the time of writing, the Remix team has stated this handler as unstable, explaining why certain functionalities, like tapping into the writing mechanism, are currently unavailable. However, adjusting it to provide this functionality is a relatively straightforward task.
Let's go Real-time – Customizing the File Upload Handler
In my demo application, I've forked the unstable_createFileUploadHandler that ships with Remix. I've renamed it to createObservableFileUploadHandler and expanded its functionalities to allow hooking into the persistence progress. The following describes how to use this modified handler:
// ~/routes/upload.tsx
import { createObservableFileUploadHandler } from "./utils/createObservableFileUploadHandler.server.ts";
export async function action({ request }: ActionFunctionArgs) {  // Fetch the overall filesize  const filesize = Number(request.headers.get("Content-Length"));
  const observableFileUploadHandler = createObservableFileUploadHandler({    onProgress({ name, filename, contentType, uploadedBytes }) {      console.log(`Uploaded ${uploadedBytes} / ${filesize} bytes.`);    },    onDone({ name, filename, contentType, uploadedBytes }) {      console.log(`Successfully uploaded ${filename}.`);    }  });
  await unstable_parseMultipartFormData(request, observableFileUploadHandler);
  return redirect("/upload/done");}
You can find the modified version of the handler in the repository of my demo application.
It essentially extends the options object to allow the usage of two callback functions. The onProgress function is invoked each time a file chunk is written to disk, while the onDone function is triggered when the write stream is closed, signaling the completion of the upload.
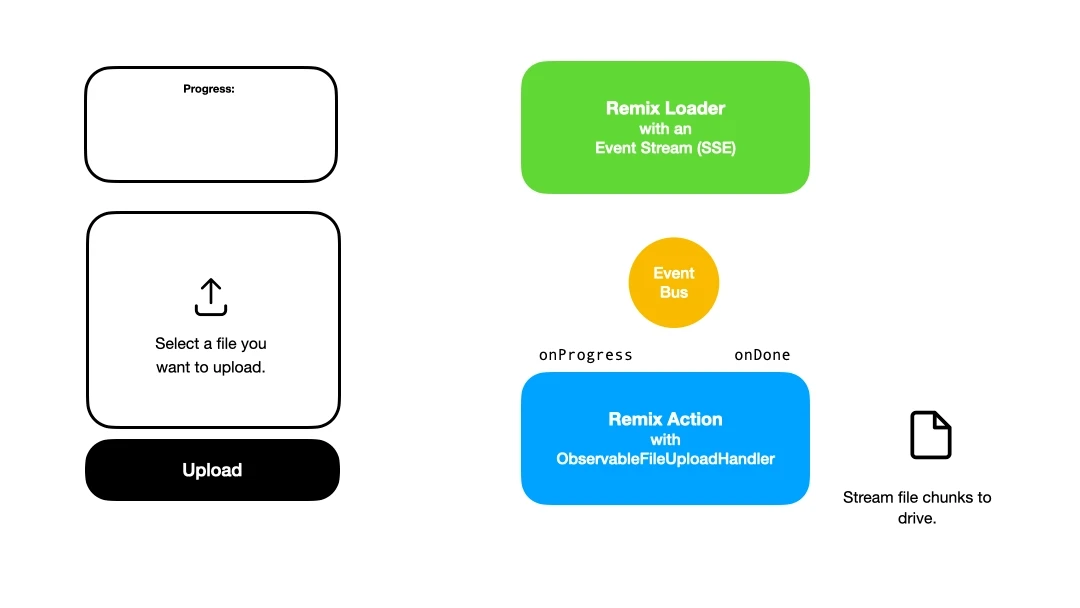
With this modification in place, we can return to the drawing board and outline the overall process, which will eventually look like this:

- A new loader returns an SSE stream. When the user navigates to the view with the file upload, the client will subscribe to this event stream.
- The user uploads the file.
- While the upload runs, the
ObservableFileUploadHandlertriggers theonProgressfunction on every file write. Within this function, we emit an event to theEventBus. - The loader responsible for providing the event stream receives this event and pushes it to the client.
- The client receives the event and displays the progress.
On to the implementation!
Implementing the EventBus
EventBus might sound complex, but essentially, it's an object instantiated as a Singleton. It's shared between the action that uses the observableFileUploadHandler and the loader responsible for providing the event stream to push down the progress events.
As we're in Node.js land here, we use the EventEmitter in our own EventBus implementation:
// ~/utils/UploadEventBus.server.ts
import { EventEmitter } from "events";
export type UploadEvent = Readonly<{  uploadId: string;}>;
class UploadEventBus {  private readonly bus = new EventEmitter();
  addListener<T>(uploadId: string, listener: (event: T) => void) {    this.bus.addListener(uploadId, listener);  }
  removeListener<T>(uploadId: string, listener: (event: T) => void) {    this.bus.removeListener(uploadId, listener);  }
  emit<T extends UploadEvent>(event: T) {    this.bus.emit(event.uploadId, event);  }}
// Creating and exposing the singleton instance of the EventBusexport const uploadEventBus = new UploadEventBus();
It exposes three methods:
addListener: Enables the addition of a listener. The listener is a function that gets executed when an event is added to the bus.removeListener: Removes a listener from the event bus.emit: Puts an event into the event bus.
Important: An observant reader might have noticed the uploadId. This unique string identifies the specific user's upload. As you'll see later on, this ID will be generated whenever a user accesses the route responsible for displaying the upload form. It's crucial to only stream the progress information related to the user uploading the file, not information from other users' file uploads. Being able to differntiate is the purpose of this ID here.
Implementing the Event Stream Route
Now that the EventBus is set up, we'll create a new route with a loader that provides the actual event stream. The remix-utils package by Sergio Xalambrí conveniently includes a great abstraction for setting up an event stream.
The new route will be accessible via /upload/progress/$uploadId:
// ~/routes/upload.progress.$uploadId.tsx
import type { UploadEvent } from "~/utils/UploadEventBus.server.ts";
import { eventStream } from "remix-utils/sse/server";import { uploadEventBus } from "~/utils/UploadEventBus.server.ts";
export async function loader({ request, params }: LoaderFunctionArgs) {  const uploadId = params.uploadId;
  if (!uploadId) {    throw new Response(null, {      status: 400,      statusText: "Upload ID is missing.",    });  }
  return eventStream(request.signal, (send) => {    const handle = (event: UploadEvent) => {      send({        event: event.uploadId,        data: JSON.stringify(event),      });    };
    uploadEventBus.addListener(uploadId, handle);
    return () => {      uploadEventBus.removeListener(uploadId, handle);    };  });}
The route is requested with the uploadId as a parameter, ensuring that the client only receives its own progress events and not those of other users. Upon opening the event stream, a new listener is registered on the EventBus, specifically listening for events related to the provided uploadId. When the client disconnects, this listener is removed accordingly.
Publishing Progress Events
Before emitting the progress events during the file upload, it's essential to generate the previously mentioned uploadId within the route containing the upload form. You can use any ID-generating algorithm you prefer. In this example, we utilize nanoid due to its URL-friendly nature.
// ~/routes/upload.tsx
import { nanoid } from "nanoid";
export function loader() {  const uploadId = nanoId();
  return json({ uploadId });}
When the user submits the form, the id will be passed to the action via a query string parameter. Therefore, we have to adjust the <Form /> accordingly:
// ~/routes/upload.tsx
export default function FileUpload() {  const loaderData = useLoaderData<typeof loader>();  const currentPath = useResolvedPath(".");
  const actionUrl = `${currentPath.pathname}?uploadId=${loaderData.uploadId}`;
  return (    <Form method="POST" encType="multipart/form-data" action={actionUrl}>      <input name="the-file" type="file" />
      <input type="submit" />    </Form>  );}
Great! Now, onto our next step: Let's modify our action by creating a progress event and emitting it to the EventBus:
// ~/routes/upload.tsx
import { uploadEventBus } from "~/utils/UploadEventBus.server.ts";
type UploadProgressEvent = Readonly<{  uploadId: string;  name: string;  filename: string;  filesize: number;  uploadedBytes: number;  percentageStatus: number;}>;
export async function action({ request }: ActionFunctionArgs) {  const url = new URL(request.url);  const uploadId = url.searchParams.get("uploadId");
  if (!uploadId) {    throw new Response(null, {      status: 400,      statusText: "Upload ID is missing.",    });  }
  // Get the overall filesize of the uploadable file.  const filesize = Number(request.headers.get("Content-Length"));
  const observableFileUploadHandler = createObservableFileUploadHandler({    onProgress({ name, filename, uploadedBytes }) {      const percentageStatus = Math.floor((uploadedBytes * 100) / filesize);
      uploadEventBus.emit<UploadProgressEvent>({        uploadId,        name,        filename,        filesize,        uploadedBytes,        percentageStatus,      });    },    onDone({ name, filename, uploadedBytes }) {      uploadEventBus.emit<UploadProgressEvent>({        uploadId,        name,        filename,        filesize,        uploadedBytes,        percentageStatus: 100,      });    },  });
  await unstable_parseMultipartFormData(request, observableFileUploadHandler);
  return redirect("/upload/done");}
Previously, we simply used console.log to display the upload progress. Now, we're emitting a custom UploadProgressEvent containing the following information:
uploadId: The ID of the current upload.name: The contents of thenameattribute of the form file input.filename: The actual file name.filesize: The size of the file (fetched from theContent-LengthHTTP header).uploadedBytes: The already uploaded bytes.percentageStatus: The overall upload progress in percent.
Subscribing to Events
In our final step, we'll subscribe to the event stream when the view containing the upload form initially loads. Fortunately, the remix-utils package includes a hook for subscribing to our event stream, named useEventSource. We'll create our own hook that not only parses the actual progress event but also includes a bit of error handling:
// ~/utils/useUploadProgress.ts
import { useEventSource } from "remix-utils/sse/react";
export const useUploadProgress = <T>(  uploadId: string,  progressBaseUrl = "/upload/progress",) => {  const progressStream = useEventSource(`${progressBaseUrl}/${uploadId}`, {    event: uploadId.toString(),  });
  if (progressStream) {    try {      const event = JSON.parse(progressStream) as T;
      return { success: true, event } as const;    } catch (cause) {      return { success: false };    }  }};
We're almost done. This hook can then be used in the actual route /upload:
// ~/routes/upload.tsx
import { useUploadProgress } from "~/utils/useUploadProgress.ts";
export default function FileUpload() {  const loaderData = useLoaderData<typeof loader>();  const currentPath = useResolvedPath(".");
  const progress = useUploadProgress<UploadProgressEvent>(loaderData.uploadId);
  const actionUrl = `${currentPath.pathname}?uploadId=${loaderData.uploadId}`;
  return (    <>      <Form method="POST" encType="multipart/form-data" action={actionUrl}>        <input name="the-file" type="file" />
        <input type="submit" />      </Form>
      {progress?.success && progress.event ? (        <p>          {progress.event.percentageStatus}% · {progress.event.uploadedBytes} / {progress.event.filesize} bytes transferred        </p>      ) : null}    </>  );}
Having implemented this, the useUploadProgress hook subscribes to our SSE event stream. Whenever a new event is pushed down, the component re-renders, showcasing the updated information on the file upload progress. This functionality opens doors for great visualizations of the upload progress, such as displaying a Progress Bar.
Furthermore, having full control over the event structure allows for various enhancements that significantly improve the user experience.
Demo Application
As highlighted in the article, I have compiled a repository that includes a demo application. This application features two examples:
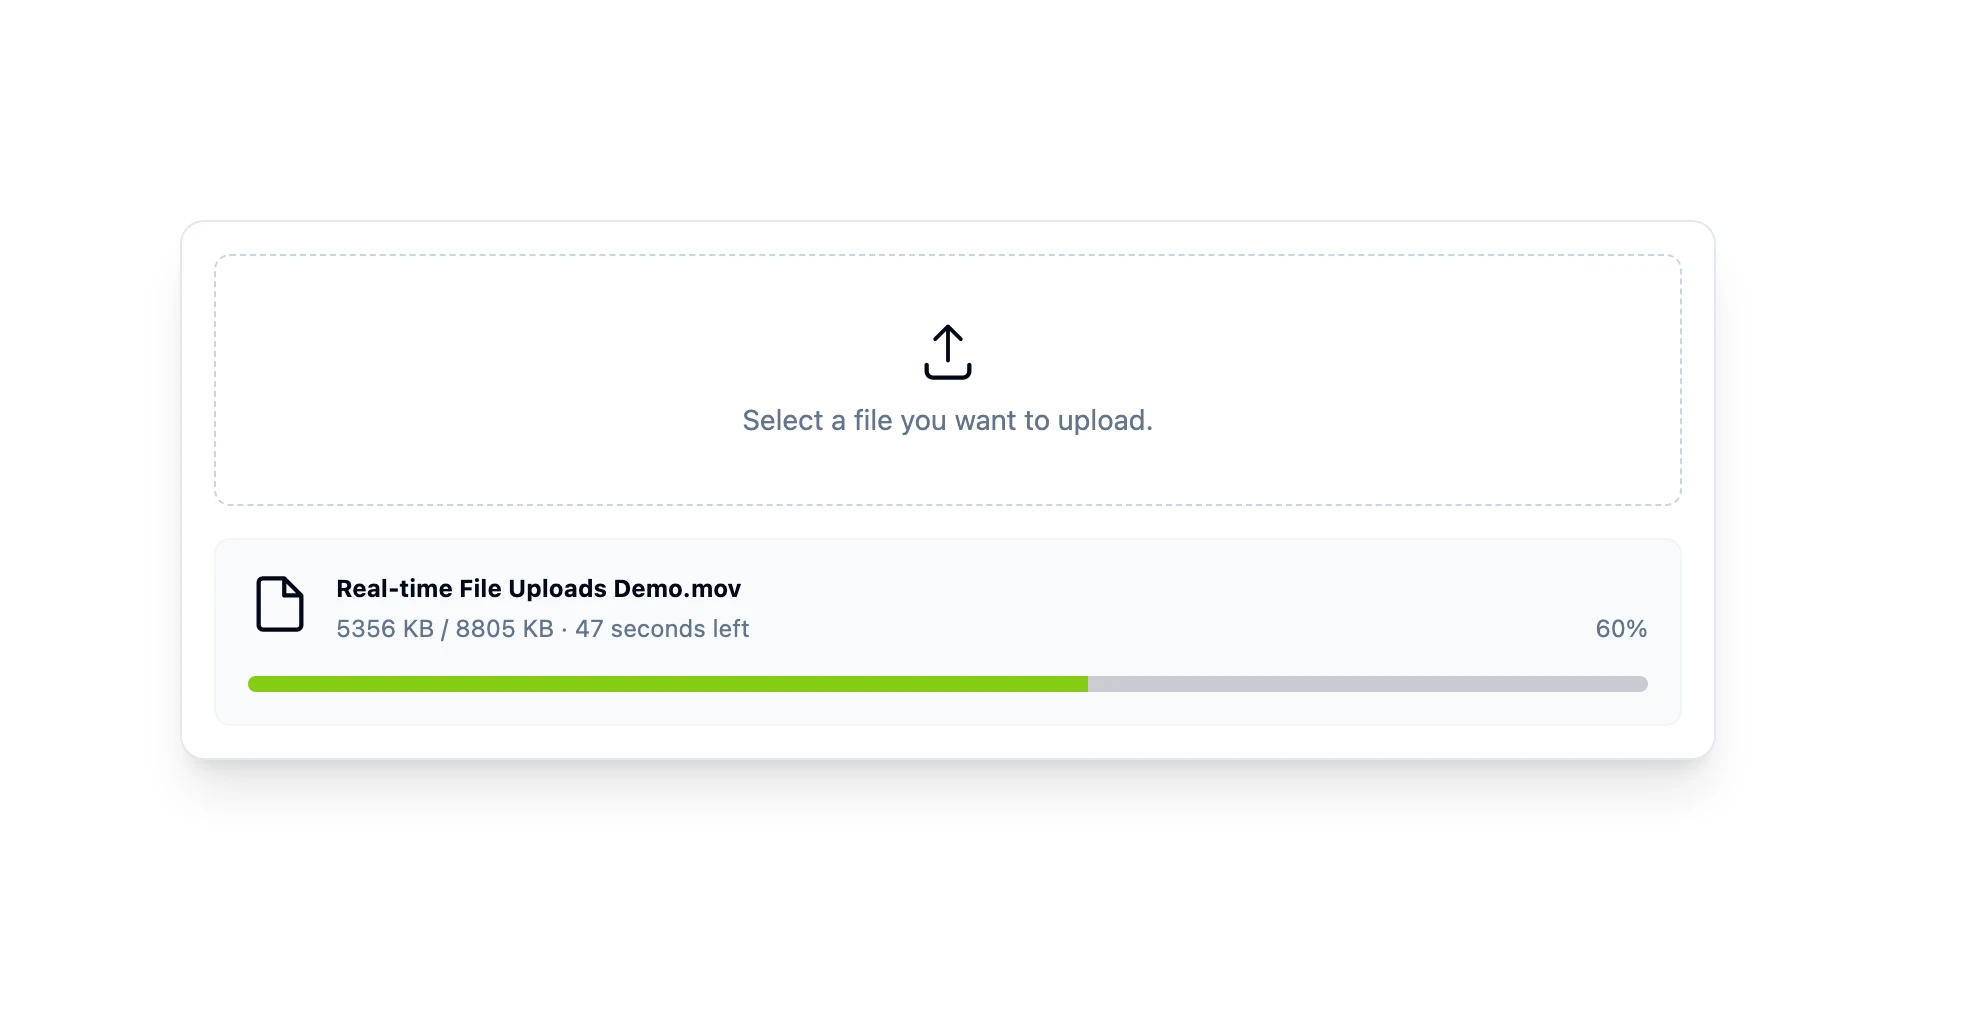
- Basic: This example demonstrates a file upload process with a progress bar that displays the status of the current file upload.
- Advanced: This example showcases a more detailed file upload process, providing additional information such as an estimated completion time for the upload.
The repository is available on GitHub. I also invite you to test-drive the app which I deployed on fly.io: Remix Observable Uploads.
One final important note: Since we're using Server-Sent Events (SSE), it's crucial to ensure that your infrastructure supports it. Therefore, you should verify with your provider—where your Remix application is hosted—if they support SSE natively. Jacob Paris has written an awesome article about the current hosting options for Remix apps, where he also assesses whether the provider supports Server-Sent Events.
 André König