 André König
- Nov 15, 2023
- 8 Min Read
- qa
Biome - Unified Linting and Formatting Solution
Optimizing code style inspections to elevate developer experience and cut costs.
Code is made for humans; it is a medium.
Otherwise, our keyboard would just consist of ones and zeros that we're hammering to tell the machine what to do.
To communicate properly, we have to make sure that we apply conventions we all agreed on. In the past, the community followed the philosophy of building well-ordered tools that do one thing well. That is why we use separate tools like Prettier and ESLint to enforce these code conventions.
But is it really necessary to use multiple tools for formatting and enforcing your codebase? The team behind Biome answers this question with a resounding "No!" and offers a single tool that combines these tasks.
One Tool to Rule Them All
From my perspective, the philosophy of Biome is based on two core aspects:
- Be as fast as possible.
- Offer a batteries-included experience.
There is a trend to write developer tools in Rust, and Biome is no exception. At first glance, you might wonder why it is written in a different language than the one it is targeting. Rust programs are usually known for their exceptional speed. This not only improves the Developer Experience (DX) by executing the formatting and linting recommendations on every file change but also saves actual money by minimizing the runtime duration of your CI/CD workflows, as these tasks need to be executed on every push/release as well.
The second part is based on a certain kind of fatigue when it comes to tooling in the ecosystem. When starting a project, you have to make sure to configure numerous tools, namely ESLint for linting your code and Prettier for formatting it. This friction led to a movement within the ecosystem to provide tools that come with "batteries included" – more functionality combined in one tool.
Features
Biome's characteristics can be categorized into three distinct areas:
- Analyzer: The analyzer allows you to organize your ESM imports using natural ordering.
- Formatter: An opinionated code formatter that eliminates endless style debates and lets teams focus on the real work (IMHO, building the product).
- Linter: It scans your code to identify potential issues. Upon detecting a problem, it provides clear guidance on how to rectify it.
Usage
Installation
Biome is getting distributed in multiple ways. One way is to download the binary and install it globally on your system.
I recommend installing it as a devDependency in your respective project. You can do that by using your specific package manager:
# npmnpm i --save-dev --save-exact @biomejs/biome
# yarnyarn add --dev --exact @biomejs/biome
# pnpmpnpm add --save-dev --save-exact @biomejs/biome
# bunbun add --dev --exact @biomejs/biome
You might wonder why it is necessary to install the exact version. This is because the linting rules are embedded within it. A subsequent version could contain a different rule that prevents your codebase from passing the linting process. Installing the exact version ensures that your script won't fail unexpectedly.
After installing the dependency, you're ready to go. Biome comes with sane defaults and does not require a dedicated configuration file.
Check Codebase
Although, it is possible to manually format (docs) and lint (docs) in two separate steps, I like the convenience of having just one single command to do both.
When the actual source files are located under src/, I can just execute one single command to do the following in one go:
- Format all files
- Lint all files
- Organize all the ESM imports
And by adding --apply to the command, Biome will also write the formatted output directly into the file and apply safe fixes during the linting stage.
# npmnpx @biomejs/biome check --apply src/
# yarnyarn dlx @biomejs/biome check --apply src/
# pnpmpnpm dlx @biomejs/biome check --apply src/
# bunbunx @biomejs/biome check --apply src/
# denodeno run -A npm:@biomejs/biome check --apply src/
Editor Integration
Although it is recommended to perform these checks using git hooks, integrating the checks into your editor is even more convenient, as it ensures they are performed after each file change.
Biome provides first-party extensions for VS Code and JetBrains IDEs, and there are third-party plugins available for Neovim and Helix. The following instructions detail how to integrate Biome into VS Code.
- Install the Extension: Open the Command Palette (Ctrl/⌘+P) and input
ext install biomejs.biome - Configure Default Formatter: Open the VS Code Settings of your workspace (search for "default formatter") and select "Biome".
- Configure "Format on Save": Search for "Format on Save" and select the checkbox.
CI/CD Integration
Another important step is to integrate checking your codebase into your CI/CD workflows. Fortunately, Biome provides its own command for it. Depending on your CI/CD system (e.g. GitHub Actions, GitLab CI/CD, Jenkins, etc.), the check step should happen on every push. The following example describes the configuration steps for GitHub Actions:
name: QA
on:  push:  pull_request:
jobs:  quality:    runs-on: ubuntu-latest    steps:      - name: Checkout         uses: actions/checkout@v4      - uses: oven-sh/setup-bun@v1        with:          bun-version: 1.0.11      - name: Run Biome        run: bunx @biomejs/biome ci src/
Configuration (optional)
As mentioned before, Biome ships with sane defaults and fits into the category of zero-config tools. Nevertheless, you can configure the behavior via one biome.json file that can be created initially via:
# npmnpx @biomejs/biome init
# yarnyarn dlx @biomejs/biome init
# pnpmpnpm dlx @biomejs/biome init
# bunbunx @biomejs/biome init
# denodeno run -A npm:@biomejs/biome init
This can be used to influence the mechanics of the analyzer, the formatter and the linter. We at Open Formation, for example, usually change the indent style from "tabs" to "spaces".
{ "$schema": "https://biomejs.dev/schemas/1.3.3/schema.json", "formatter": { "indentSize": 2, "indentStyle": "space" }}Benchmarks
As previously mentioned, one of Biome's core philosophies is to be fast. However, before introducing Biome, I wanted to verify just how fast it truly is.
I needed a repository that currently utilized the "de facto standard" combination of ESLint and Prettier. Fortunately, the Remix project also uses these, making this repository an ideal candidate.
ESLint & Prettier vs. Biome - Let's Prepare for the Showdown.
I performed linting and formatting on the packages/ directory via the following commands:
ESLint & Prettier
# Lintingtime ./node_modules/.bin/eslint --cache ./packages
# Formattingtime ./node_modules/.bin/prettier --ignore-path .eslintignore --write ./packages
Biome
# Linting./node_modules/.bin/biome lint packages --apply
# Formatting./node_modules/.bin/biome format packages --write
Here are the results:
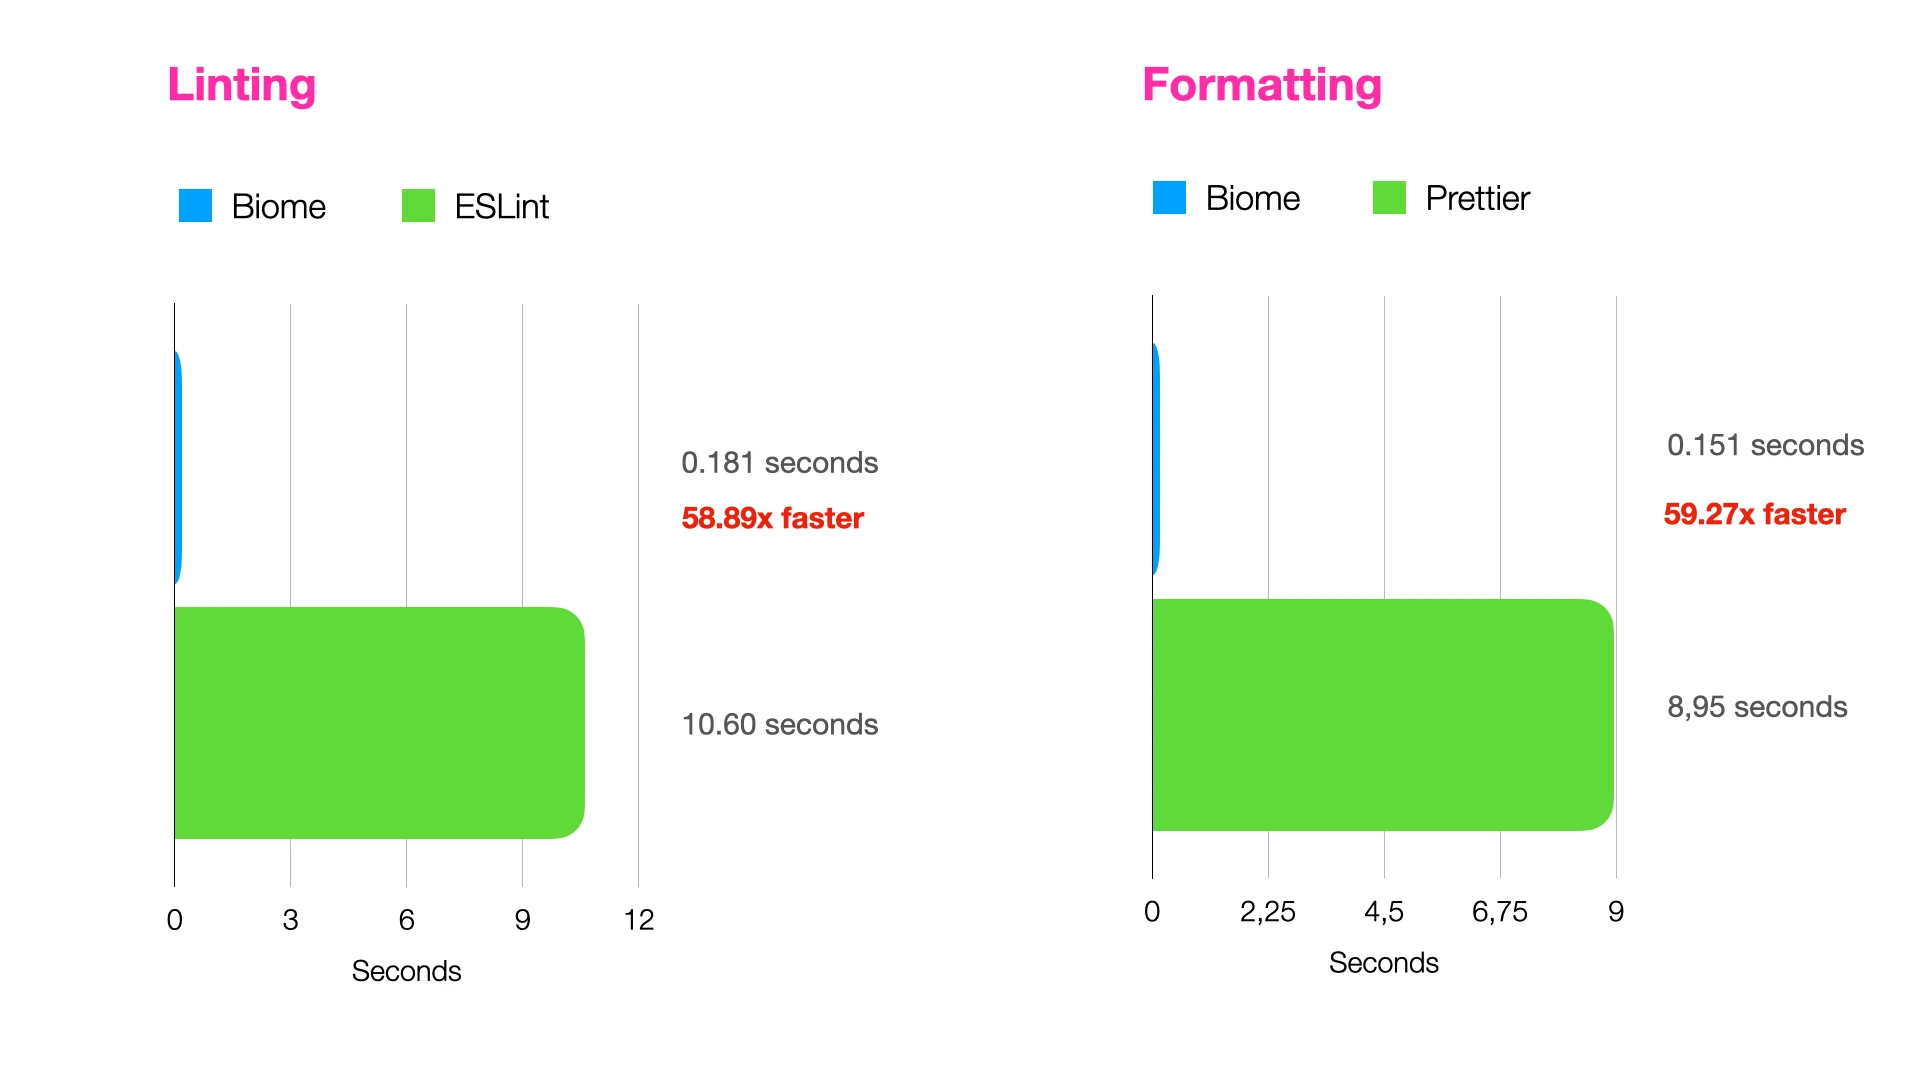
Biome excels in both categories and significantly enhancing performance in these areas.
Conclusion
In conclusion, Biome offers a unified solution for linting and formatting, providing a faster and more convenient alternative to using separate tools like ESLint and Prettier. Biome's speed, built-in features, and seamless integration into diverse environments enhance both developer experience and productivity, making it an indispensable asset to modern web development projects.
On a personal note, it is currently unclear whether the community is willing to replace ESLint and Prettier with Biome. Rome Tools, the predecessor project, did not gain traction since its inception. However, I have noticed more discussions about Biome and see enormous potential in the tool, hoping for an increased adoption rate over time. Simplifying the toolchain, along with significant performance improvements, leads to better developer experience (DX) and shorter CI/CD runtimes, which is valuable in its own right.